Will we or wont we was the question on my instructors and I’s mind this morning. We had cancelled yesterdays flight because of poor weather and we kept checking the TAFs and METARs for Stansted, Southend

On the aviation chart there are two:
⬡ Hexagon marking
Sometimes surrounded by a square, indicating that it is also a DME (Distance Measuring Equipment)
SID:
– Select
– Identify
– Display
Select:
- Press C/N (Comms/Nav)
- The larger end of the nob (closer to the radio set) is twisted for the frequency before the decimal
- The smaller end of the nob is twisted for the frequency after the decimal
- Switch button to switch over Standby and Active NAV
Identify:
- Press in radio button for ID
- Turn the volume up
- Record* or follow the pre-recorded morse code and confirm that you have corrected to the correct one
- Turn the volume back down
Display:
- Check no NAV flag (aka an error)
- Twist the knob so that TO/FROM is selected as desired and so the needle moves to the middle
- This is the
* Really this should have been prepared in advance, but there is a possibility on the skills test that an alternative one would be needed. The aviation chart will have the frequency and morse code alphabet in the key.
Note: May here other frequencies on top, just turn up the volume and listen out
Throughout this don’t forget to listen out to the normal radio
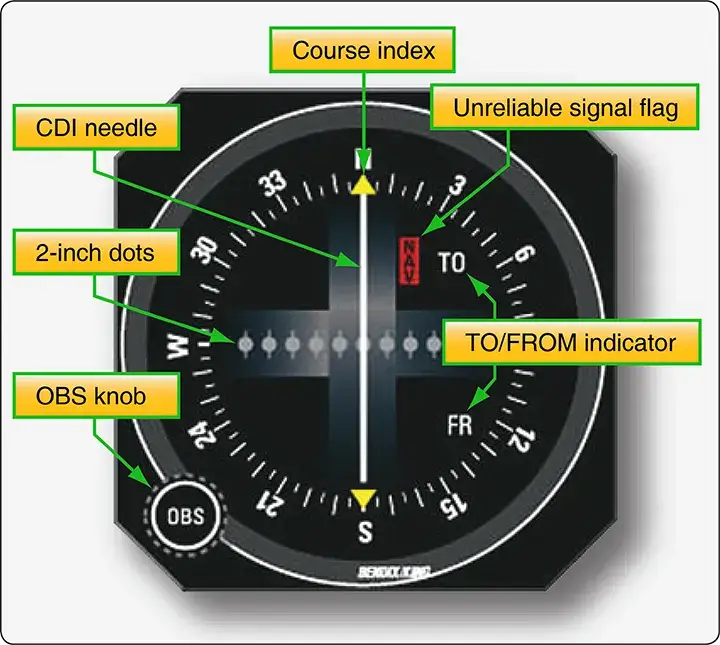
The nav flag means there is unreliable signal – as it requires line of sight. This will be expected on the ground.
Obviously it will switch from To to From as you pass by it – this is most keenly seen while passing over ahead, the needle will move quickly
As it is the track, you do not need to account for wind just maintain the heading. (is this true?)
Position Tracking?
A 2nd VOR can be used to find your location. Repeat the steps to program the secondary VOR, switch to active and twist the knob so that we have the heading. TO or FROM can be used but FROM will likely to be easier to remember to mark on the map e.g. 340deg.
The aviation chart has a compass around the VOR marker, with small 10deg marker headings. Use the ruler to draw a lineBe sure to draw the line as far as might be needed to avoid coming back to it
When switching to the 2nd VOR, be careful not to begin tracking the 2nd one, as the VOR instrument will now be the 2nd one and as I have been focusing on following that DR. It could help by writing it down!
Need to practice reciprical directions
Some other feedback from todays aborted nav brief:
- Use the Met Office 214? spot chart for wind
- Keep it the same, don’t change the wind half way or try to be too precise
- Confirmed that I do want to be consistent on altitude, there is no need to lower the altitude just because the safety altitude is lower